

Tuesday, July 27, 2010
DIY custom napkins
Make your own custom napkins for a fraction of the cost!

via amy atlas events


Custom Napkins

Materials Needed:
The PicnicNapkin_DIY_Template!
Paper Napkins
1.5″ Circle Punch
Iron-on Transfers
Iron
Ink Jet Printer
Instructions:
1. Download table number’s PDF and print onto Iron-on transfer paper as directed. Depending on what transfer paper you use you made need to revers the template before you print so take special note. Trim each circle out using a 1.5″ circle punch taking extra care to line up the edges. If you don’t have a 1.5″ circle punch than a craft knife can be used instead.
2. Determine where you’d like the design to appear on your napkin and place carefully on your napkin. Follow the instructions that come with the transfer paper to adhere the art work.
3. Ta-da! Unique and custom napkins without the cost!
via amy atlas events
DIY handmade notepads
This would make a great custom party favor: emblazoned w/ a note to guests or artwork that is reminiscent of your event!

Materials needed:

Materials needed:
(How to PDF)
3-4 packs of A2 Note Cards (use two different colors for a jazzy pad!)
PVA
Glue Brush
2 Rulers
1-2 Jumbo Binder Clips
Instructions:
1. Stack A2 Note Cards (alternating colors optional). Jog sides back and forth on a flat level surface until desired edge is completely flush.
2. Cover one edge with PVA to bind cards.
3. Carefully sandwich the glued edge between two rulers, then clamp with jumbo binder clips. The rulers will protect the paper from the clips. Set aside to dry.
4. If necessary, apply another layer of PVA and set aside to dry. Once completely dry, unclamp and use!
Thursday, July 22, 2010
Oh Happy Day - FREE DIY CARD & ENVELOPE
Oh Happy Day....Make your own Wedding/Birthday/Any Occasion Card. Design prints beautifully to any black & white printer.

CARD:
1. Click on card image above to open the full size version
2. Right click to save as (mac users - ctrl click) to your desktop
3. Open the image & print to the 8.5"x11" cardstock of your choosing
4. Cut using the crop marks as your guide. (A ruler & xacto knife works best)
5. Fold in half
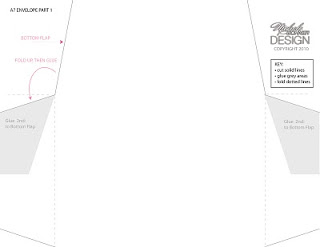
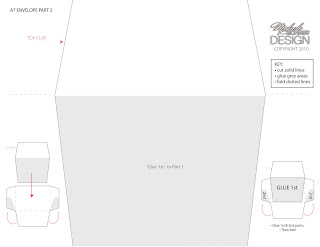
A-7 ENVELOPE:
1. Click on each envelope image above to open the full size version
2. Right click to save as (mac users - ctrl click) to your desktop
3. Open the image & print to each on the 8.5"x11" text weight paper of your choosing. (Bright paper looks great w/ a black & white card!)
4. Cut on the solid grey lines
5. Glue 1st area, as marked
6. Fold up bottom flap & glue 2nd area, as marked
7. Fold on all other dotted lines (see diagram for examples)
8. Enjoy your fab, hand-crafted card & envelope!
BE SURE TO CHECK OUT MY ETSY SHOP: sierraPRINT!
Thursday, July 01, 2010


Subscribe to:
Posts (Atom)